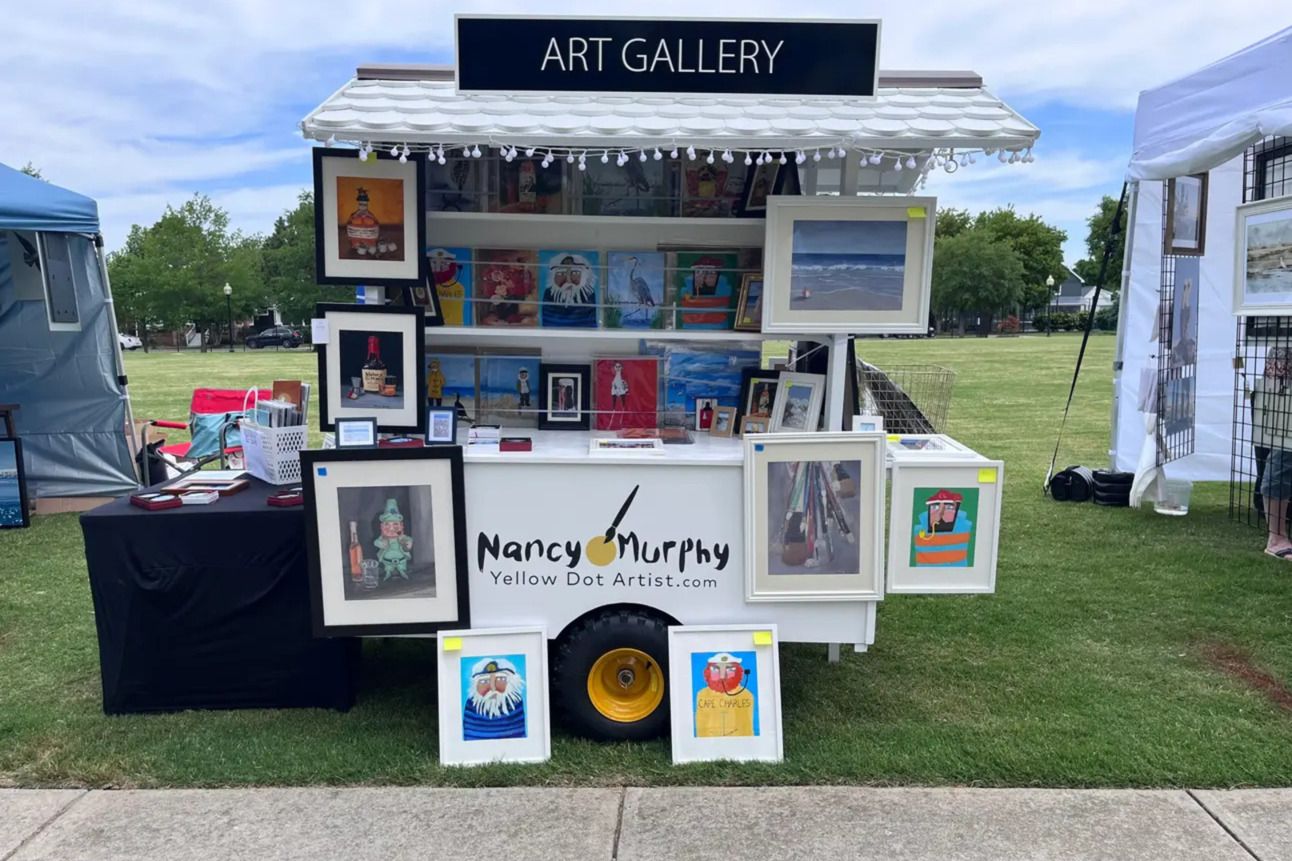
When I saw this clever mobile display, I smiled. I love how Nancy Murphy from Yellow Dot Artist came up with unique display. Her display allows her to set up for her shows in minutes instead of hours. What a wonderful idea! Read on to learn all about how she sets up her displays now.
Tell us the story behind how you designed this craft fair display?
After four years of doing art markets, I found myself questioning whether I wanted to keep going. The traditional setup had become downright exhausting—lugging heavy bins, setting up a tent alone, hanging walls for my artwork, and arranging tables for smaller pieces. It took two hours to set up and another hour to tear down—not to mention the unloading once I got home. It was physically draining and started to take the joy out of showing my art.
I knew there had to be a smarter, more efficient way. I began envisioning a mobile setup—something that could roll in, open up, and be ready to go in minutes. I wanted it to function like a tiny traveling gallery, complete with shelves for displaying art, storage underneath, and a charming, inviting design that reflected my style.
That’s when I hired a local woodworker to bring the idea to life. I told him I wanted it to feel like a tiny home—really cute, practical, and thoughtfully organized. He sketched an initial design, and together we spent time tweaking it until it met all my needs. The process was genuinely fun—part creative collaboration, part problem-solving.
Now, instead of dreading setup days, I actually look forward to them. My mobile display isn’t just easier to manage—it turns heads, draws people in, and makes the whole art fair experience feel more joyful and professional.

How did you adapt your design to fit the type of event you were attending?
I designed my mobile art display to be flexible and strategic so I could easily adapt it to the type of event and the audience attending. Every show has its own vibe, so I tailor the front-facing artwork to immediately catch people’s attention. For instance, I’ve learned that men often won’t walk up to the cart, or on the other side unless they see something that speaks to them—so I make sure to feature prints like Maker’s Mark or Crown Royal right up front, since those always grab their interest. Around patriotic holidays like the 4th of July or Memorial Day, I’ll showcase my American flag print prominently. In the spring, I rotate in floral pieces to reflect the season and attract a different crowd. No matter the event, I always display my two best-selling prints—The Secretary Bird and a $7,000 Pappy Van Winkle—on the front of the cart. These anchor pieces are strong attention-grabbers and help pull people in. In addition to the art, I’ve added a layer of professionalism with printed signs that clearly list the types of payment I accept—Venmo, credit cards, and Zelle—so customers feel confident making a purchase.
I include signage for the other services I offer—private lessons, upcoming classes, and how to commission a custom piece. Copies of my “How to Sell Art” book series are displayed on the cart, along with a holder for business cards. The display isn’t just about showing art—it’s a compact, curated representation of everything I offer as an artist and teacher. It acts as my storefront, my marketing hub, and my silent salesperson all in one.

What kinds of materials did you use to create this display?
I built my display using a combination of durable and lightweight materials to balance mobility, function, and visual appeal. The foundation is a trailer I specifically chose because it had bright yellow rims—an intentional nod to my branding as the Yellow Dot Artist. That small but bold detail helps make my setup instantly recognizable and cohesive with my artwork.
The main structure is crafted from wood to provide strength and stability, while still being light enough for easy transport. I added lockable wheels so I can roll it in and out of events without assistance. The shelves are finished wood, designed to securely hold framed originals and prints while keeping the look clean and professional. I also installed hooks and rails to safely hang art pieces without causing damage.
Because I often show my work in windy areas, I added a simple but effective solution: three elastic bands across each shelf to keep prints and frames from blowing off during shows or while in transit. That small adjustment has saved me a lot of hassle and keeps everything secure no matter the weather.
Every element of the design was intentional—from the branding details to the functional adaptations—to make setup easier, showcase my art beautifully, and handle the real-world challenges of outdoor events.
Subscribe to Handmade Seller Magazine to read the rest.
Become a paying subscriber of Handmade Seller Magazine to get access to this post and other subscriber-only content.
UpgradeA subscription gets you:
- Access to this article, plus our entire back catalog
- Special subscriber only articles on important publicly traded companies in our industry, such as Etsy, Pinterest, and Shopify
- Access to our beautiful quarterly magazine, to read articles online or download
- Print subscriptions are also available for addresses in the United States of America